
ГЦС-РОБОТ
Наш телеграм-канал с новостями: https://t.me/cmcrobotkrasnodar
Наш канал в MAX: https://max.ru/id2311239892_biz
- 8-800-550-6875
- krasnodar@cmc-robot.ru
- Мы работаем без выходных и праздников
Description CMC01-ishift Kit
CMC01-ishift kit is intended to use with IMT I-SHIFT with clutch master cylinder LuK G1D500101, so the kit fits for every car with that type of transmission. It is some experience have been taken into account with our previous designs (for example, CMC01, for Easytronic and Durashift EST), so we used proven solutions with CMC01-ishift.
There is no need for kit modifications, completing or testing: it has been tested well already and is ready to be installed.
There are time-tested materials used: corrosion resistive aluminum alloys with and without anodizing, brass alloys also – everything machined with CNC or without. We provide 3 years warranty, anyway the kit can be maintained with relative simplicity (it is easy to overhaul it in minutes with our repair kit).
Reliable type of valve used and it has been tuned for more depressure value than original valve that is why clutch control is much more stable in tough drive conditions (for example, longterm city traffic jams) – it feels easier to drive. Tiny space between actuator body and cylinder is an extra barrier for road dust and mud.
Unfortunately, the kit does not rehabilitate worn out clutch and clutch slave cylinder (mounted at cylinder block).
Download CMC01-ishift Kit Description and Installation Guide
Installation Guide for CMC01-ishift Kit (Honda)
1. There is no need for kit modifications or completing. Piston clamp is similar to original clamp, that is why installation principle is the same as for original cylinder.
2. There is no need for additional testing: the kit has been already factory well-tested. Be careful to avoid shooting your eyes with fluid residuals (brake fluid DOT4 used for testing).
3. Make sure fluid and friction surfaces are always clean during installation and operation from any type of contamination (oils, fuels, solvents, WD40, etc.) – it is basic requirement for reliable and durable operation of the kit.
4. To install cylinder:
− provide piston position at least 25 mm (1 inch) above the cylinder top cap. It is required to lubricate piston with brake fluid DOT4 and move it along its axis repeatedly (so the piston will slide smoother than before lubricating);
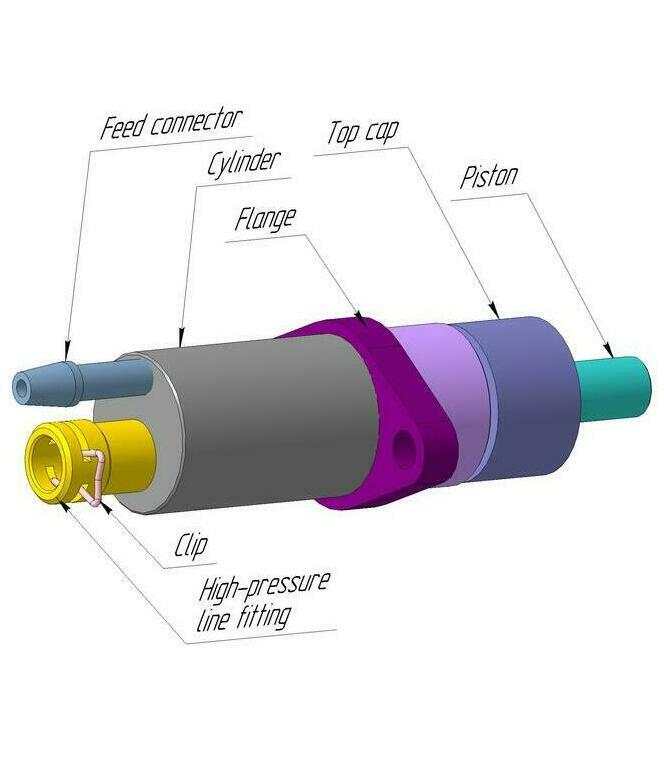
− place the cylinder to actuator and make sure the push rod will be guided directly inside piston and the feed connector will be above the high-pressure line fitting after mounting actuator in engine compartment. Tighten the flange of cylinder to actuator body with bolts;
− shortly supply compressed air (up to 8 bar) into high-pressure line fitting till clamp in the piston snaps push rod (till click sound is heard). It should be easy for air to pass through the cylinder in any direction (through high-pressure line fitting to feed connector and vice versa), it indicates proper snapping of the push rod in the piston (push rod should be in the upper position, it takes that position just after ignition turned off, so no additional actions needed);
− mount actuator assembly in engine compartment;
− connect original high-pressure line and feed pipe to the cylinder;
− make sure actuator assembly touches nothing around, for example, cooling pipes to avoid damage in some time.
5. Bleed up hydraulic system, check for leaks. Cylinder has some peculiarities in valve design to improve stability of system that is why you should use manual bleeding procedure below for the initial filling with fluid: to avoid excess saturation with air during bleed process (just to make the process faster):
a) fill up expansion tank and connect bleed hose to bleeder valve;
b) turn ignition on (it creates some pressure in hydraulic system);
c) loosen the bleeder valve to release fluid and air bubbles from system then close bleeder valve;
d) turn ignition off (piston of clutch master cylinder returns in unpressurized position), expansion tank fluid should be sucked into hydraulic system because of created depressure. Maintain fluid level throughout the process;
e) repeat steps b-d up to a steady stream of brake fluid without any bubbles comes out of the bleeder valve;
f) push several times to clutch slave cylinder piston by hand through clutch release fork or directly to the piston. There some big bubbles can appear in expansion tank while pushing;
g) repeat steps b-d up to a steady stream of brake fluid without any bubbles comes out of the bleeder valve;
h) turn ignition on and off 3-5 times to definitely remove free play of clutch slave cylinder piston formed after steps f and g.
6. It is recommended (but not always necessary) to adjust clutch with special software after just the kit has been installed. In further let the gear selector stay in “A” position at short stops for transmission to be able self-learning for best shifting.
7. Replace fluid in 1000 kms (about 600 miles) and then – every half a year. It is possible replace fluid by replacing it only in expansion tank periodically without full bleeding procedure, for example, with medical disposable syringe, to keep the fluid clean. Usually there is no necessity in adjusting clutch with special software after fluid replacing procedure.